
Are you looking to change the font on your WordPress theme to something different?
Your website text font plays an important role in your site’s design and brand identity. It can improve the readability of your content and make your site look modern and professional.
In this article, we’ll show you how to change font in WordPress using 5 different ways, so you can easily change fonts using no-code method, or change WordPress font without using any plugin.
Why Change Fonts on Your WordPress Website?
Fonts are an essential part of your website design and have a huge impact on how your WordPress site will look and feel.
If your website has a difficult font to read, then it will be hard to retain visitors, and they’ll eventually abandon your site.
A font also shows your brand identity. For instance, you can use specific fonts to make your site look more professional, or casual.
WordPress themes come with a default font, font size, and font color for your website. However, you may want to change the default font to something different.
That said, there are several ways of changing fonts in WordPress. We’ll show you several different methods. You can click the links below to jump ahead to any section.
- Changing Fonts in WordPress Theme Customizer
- Changing Fonts in WordPress Full Site Editor
- Change WordPress Fonts Using a WordPress Plugin
- Change Fonts Using a WordPress Theme Builder
- Customize Font Appearance in WordPress Content Editor
Changing Fonts in WordPress Theme Customizer
An easy way of changing your site’s font is by going to the WordPress theme customizer. It allows you to change the appearance of your website and shows a real-time preview.
Note: If your customizer menu option is missing, then your theme likely has full site editing enabled and you’ll need to use a different method or switch themes.
For this tutorial, we’ll use the Astra theme. However, the options will change depending on the WordPress theme you use. Depending on your theme, you’ll want to look for ‘font’ or ‘typography’ options in the customizer.
First, you can head over to Appearance » Customize from your WordPress dashboard.
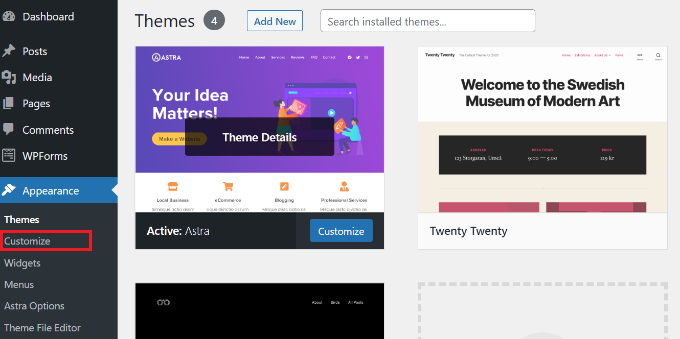
This will launch the WordPress theme customizer.
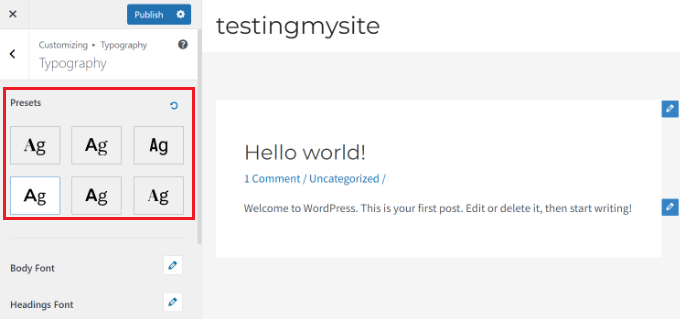
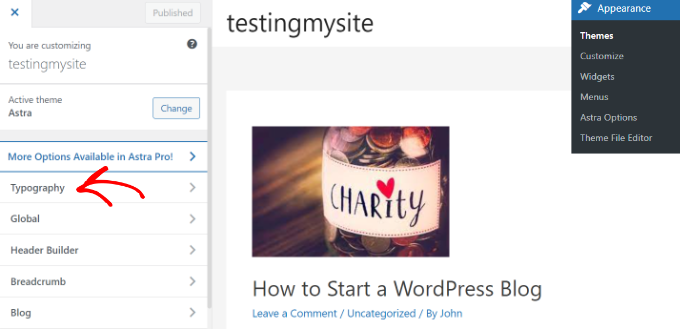
The Astra theme has a ‘Global’ section with options to change site-wide styles. To change the font on your whole website, you can click the ‘Global’ option from the menu on your left.
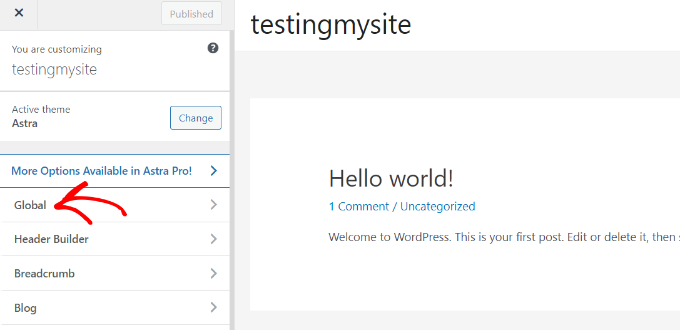
On the next screen, you’ll see options like typography, colors, container, and buttons.
Go ahead and click the ‘Typography’ option.
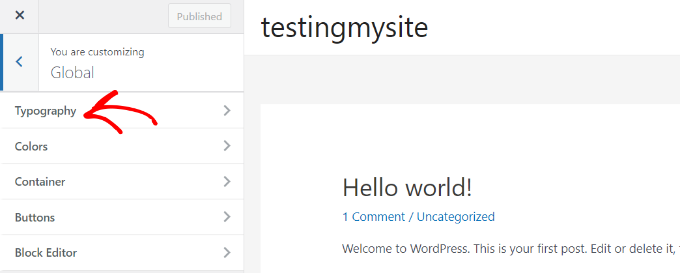
From here, you can choose different fonts under the ‘Presets’ section.
These are default fonts offered by the theme and selecting a preset will change the font on your entire website.
Besides that, you can also change fonts for individual elements on your theme.
For example, you can use a different font for body and headings. There are even options to use separate fonts for each heading level.
To start, simply choose a font from the ‘Font Family’ dropdown menu for any individual element.
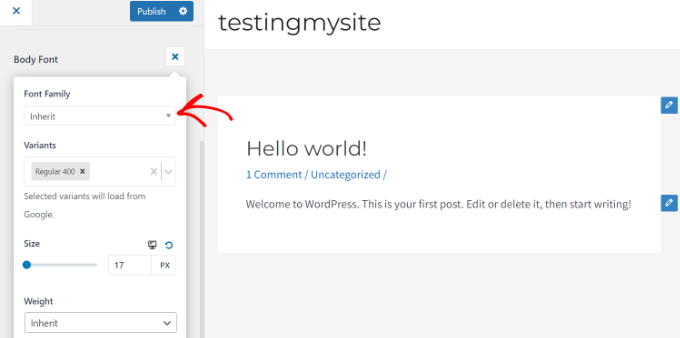
Besides that, there are more options to change the font size, weight, select variants, and more.
When you’re done, don’t forget to click the ‘Publish’ button.
You can now visit your website and see the new font. For instance, we changed the body font to Roboto and the heading font to Helvetica on our demo site.

It’s important to note that not all WordPress themes will offer the same features and customizations that Astra is offering. If your theme doesn’t offer that, then continue reading to the next step.
Changing Fonts in WordPress Full Site Editor
If you’re using a block-based WordPress theme like Twenty Twenty-Two, then you can change your site’s font using the full site editor (FSE).
The full site editor allows you to customize your WordPress theme using blocks, just like when editing posts or pages using the WordPress content editor. However, FSE is currently in beta and only a handful of themes support it.
For the sake of this tutorial, we’ll use the Twenty Twenty-Two theme.
To get started, you can head over to Appearance » Editor from the WordPress admin panel.

This will open the full site editor for your WordPress theme.
Next, you can click the Styles icon in the top right corner and then click on the ‘Typography’ option.
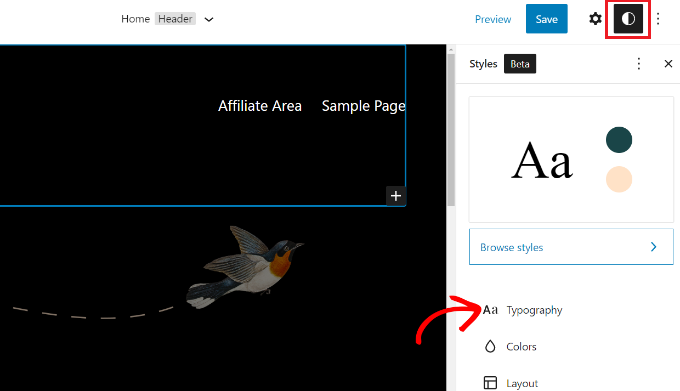
After that, you can select elements like text and links to change their typography.
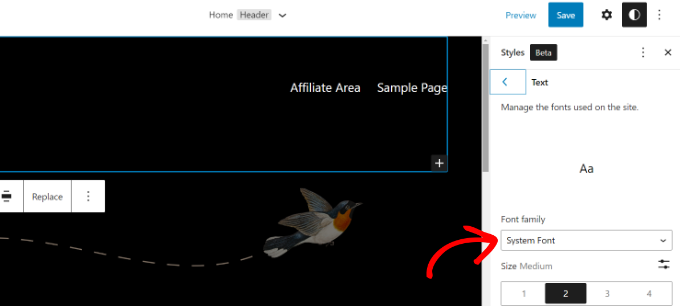
We’ll select Text as the element and then click on the ‘Font Family’ dropdown menu to change its font.
When you’re done, simply click the ‘Save’ button.
You’ve successfully changed the font using the full site editor. You can also add custom fonts to your WordPress site as well and then change them in the full site editor.
Change WordPress Fonts Using a WordPress Plugin
Another way of changing WordPress fonts is by using a WordPress plugin like Easy Google Fonts.
It’s a free WordPress typography plugin that lets you add over 600 Google fonts and different font variants to your website.
First, you’ll need to install and activate the Easy Google Fonts plugin. If you need help, then please see our guide on how to install a WordPress plugin.
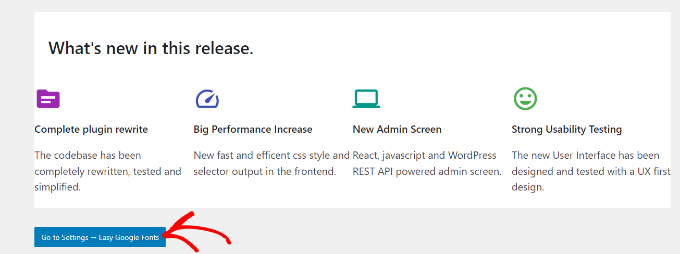
Upon activation, you will see the Easy Google Fonts welcome screen in your WordPress dashboard. You can scroll down and click the ‘Go to Settings → Easy Google Fonts’ button.
On the next screen, you will see different plugin settings.
Go ahead and click the ‘Manage with Live Preview’ button at the top.
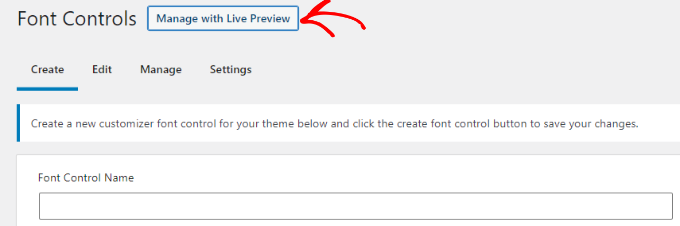
This will open the WordPress theme customizer, and you be in the ‘Typography’ tab.
Another way of accessing fonts added by the plugin is by going to Appearance » Customize from your WordPress dashboard and then clicking the ‘Typography’ tab.
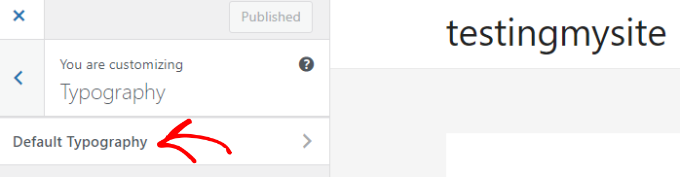
On the next screen, you’ll see the ‘Default Typography’ option.
Go ahead and click on it.
After that, you can change the font of every element on your website.
For example, let’s change the font of Heading 1. Simply click the arrow next to Heading 1 to expand the options. From here, you can click the ‘Font Family’ dropdown menu and select a font.
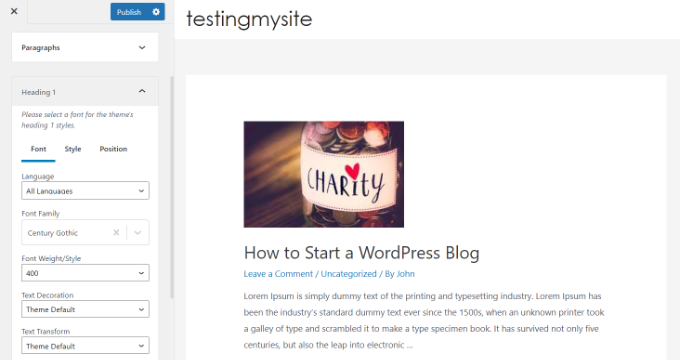
You can do the same for other heading levels and paragraphs.
Don’t forget to click the ‘Publish’ button when you’re done.
Change Fonts Using a WordPress Theme Builder
There are many powerful WordPress theme builders that let you create a custom theme without editing code. You can use them to change the font of different elements on your website.
For this tutorial, we’ll use SeedProd. It’s the best landing page and theme builder plugin for WordPress and offers a drag and drop builder to create custom themes without touching a single line of code.
Note that you’ll need the SeedProd Pro version because it includes the theme builder. There is also a SeedProd Lite version that you can use for free.
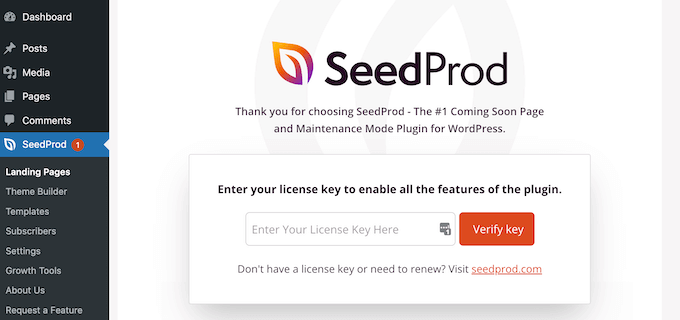
First, you’ll need to install and activate the SeedProd plugin. For more details, please see our guide on how to install a WordPress plugin.
Upon activation, you’ll see the SeedProd welcome screen. Go ahead and enter your license key and click the ‘Verify key’ button. You can easily find the license key in your SeedProd account area.
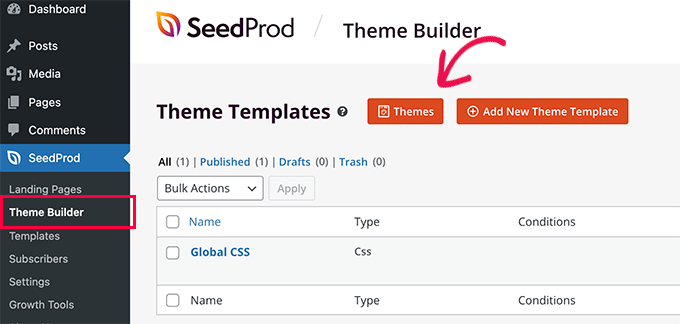
After that, you can head over to SeedProd » Theme Builder from the WordPress dashboard.
Next, go ahead and click the ‘Themes’ button at the top.
From here, the plugin will show you multiple themes to choose from.
Simply hover over a theme you want to use and then click on it. We’ll use the Starter theme for this tutorial.

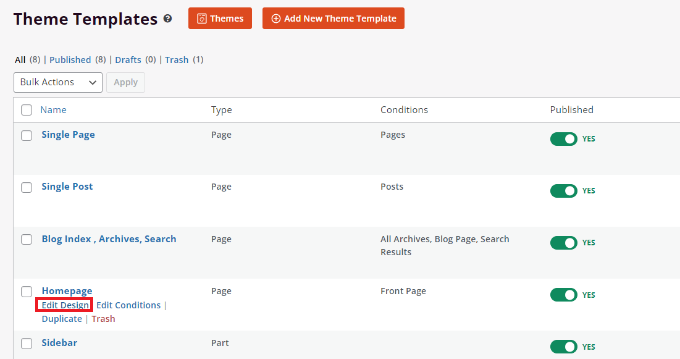
SeedProd will now generate different theme templates.
You can edit each template and customize your WordPress theme. There’s even an option to manually add a theme template.
Let’s edit the Homepage theme template and change the fonts of different elements. To start, click the ‘Edit Design’ link under Homepage.
This will launch the SeedProd’s drag and drop theme builder. You can add new elements from the menu on your left and place them anywhere on the template.
To change the font of any theme section, simply select it. For example, we’ll select the text box under the Starter heading.
Next, go to the ‘Advanced’ tab from the menu on your left and click the ‘Edit’ button in front of Typography.
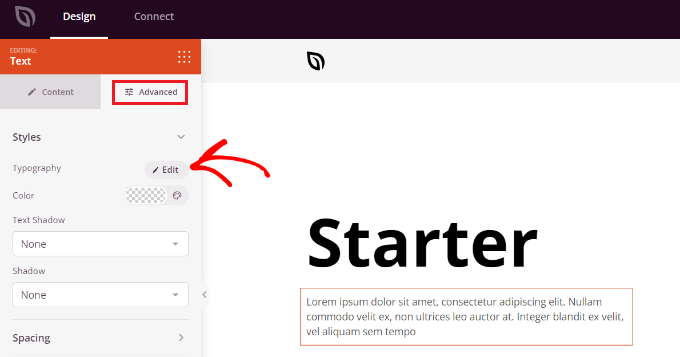
After that, you’ll see multiple options to edit the typography of your selected section.
You can click on the ‘Font Family’ dropdown menu and choose a font for your text. There are also options to select font weight, adjust the font size, line height, letter spacing, alignment, letter case, and more.
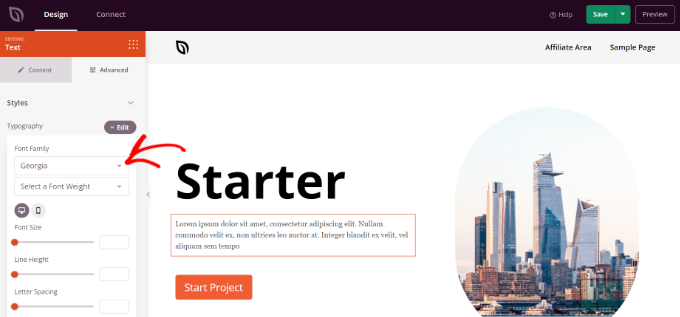
You can now repeat this step and change the font of other elements on your theme.
When you’re done, simply click the ‘Save’ button at the top.
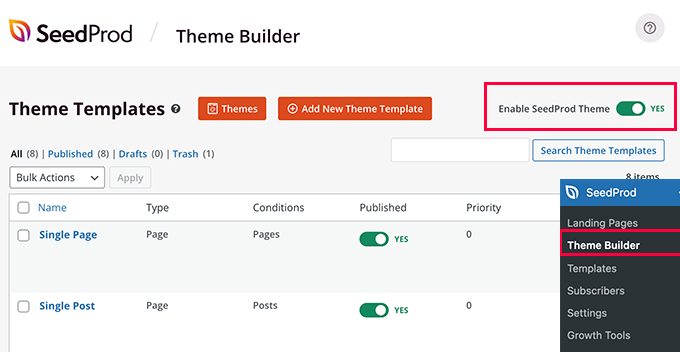
To apply the custom theme and fonts, go to SeedProd » Theme Builder and toggle the switch next to the ‘Enable SeedProd Theme’ option to Yes.
If you’re looking to create a WordPress theme from scratch, then see our guide on how to easily create a custom WordPress theme.
Customize Font Appearance in WordPress Content Editor
Using the content editor, you can also change how your fonts appear in specific blog posts and pages.
The downside of this method is that it will only apply the new font to that particular post or page only. You’d have to repeat this step manually for all other posts where you want to apply similar customization.
This can be really handy for post specific customizations, but if you’re looking for a sitewide font change option, then you should consider the other options instead.
With that said, to change the font using WordPress content editor, simply edit a post or add a new one. Once you’re in the WordPress content editor, select the text to change its appearance.
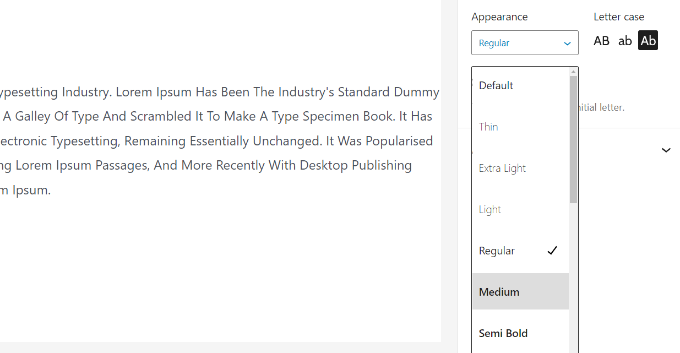
In the settings panel on your right, head to the ‘Typography’ section. Then click the 3 dots in front of Typography and select ‘Appearance’ from the dropdown options.
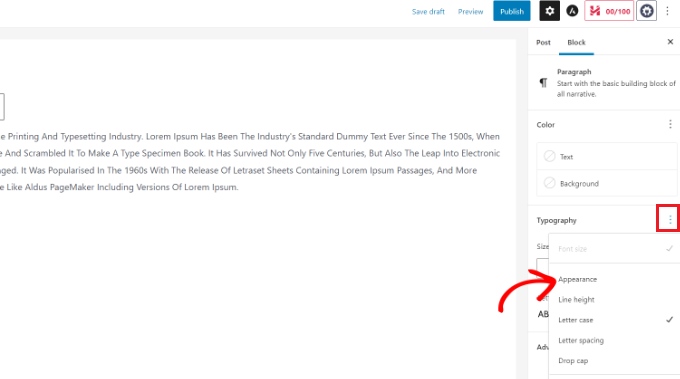
Once you do that, the Appearance settings will be visible under the Typography section.
Simply click the dropdown menu under Appearance and select a style for your font. For example, you can make the font bold, thin, italic, black, bold italic, extra bold, and more.
There are also options to change the font size, choose a letter case, edit the color, enable drop caps, and more.
Don’t forget to update or publish your page when you’re done.
We hope this article helped you learn how to change font in WordPress. You can also see our ultimate WordPress SEO guide for beginners, and check out our expert-pick of the best email marketing services for small businesses.
If you liked this article, then please subscribe to our YouTube Channel for WordPress video tutorials. You can also find us on Twitter and Facebook.
The post How to Change Fonts in Your WordPress Theme (5 Easy Ways) first appeared on WPBeginner.


